

When you see a puddle forming inside your commercial fridge, it's more than just an annoyance—it's a warning sign. That water is usually from a clogged defrost drain, forcing defrost water back into the food compartment instead of letting it properly evaporate. For any Los Angeles restaurant, from a popular pizza spot to a busy food truck, this is a problem you need to jump on immediately to protect your inventory and avoid bigger, more expensive restaurant equipment repairs down the line.
Pinpointing the Source of the Puddle
That steady drip inside your commercial refrigerator is a direct threat to your inventory and can create serious issues during a health inspection. For busy Los Angeles restaurants and food trucks serving everything from pizza to authentic Mexican food, a reliable refrigeration unit is non-negotiable. When water starts pooling at the bottom of your fridge, it's a clear signal that something in the cooling or defrosting process has gone wrong.
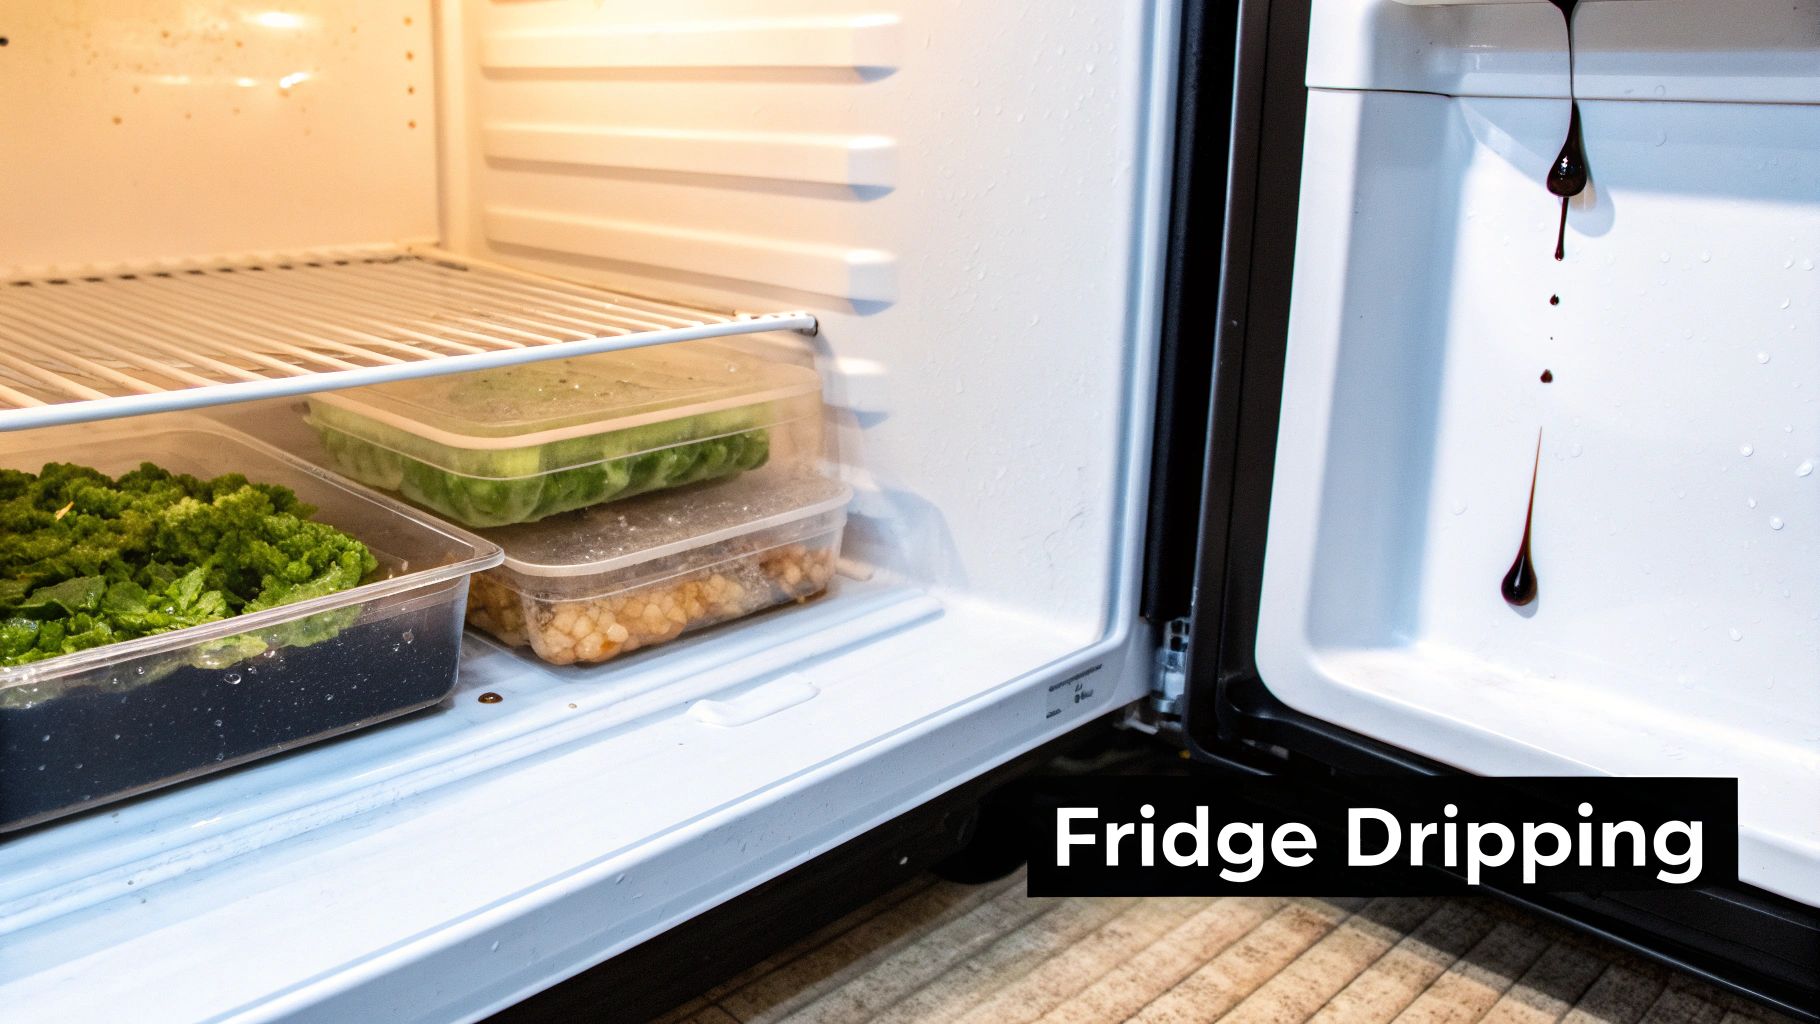
This isn’t just about cleaning up a mess. You need to figure out why your unit’s defrost cycle is failing and causing water to accumulate where it shouldn't. The problem could be as simple as an overloaded shelf blocking an air vent or something more involved, like a failing defrost heater—a common issue with older restaurant equipment.
Before you start tearing things apart, it's crucial to take a few immediate steps to manage the situation and prevent food spoilage. The goal is to contain the mess while you figure out what's really going on.
Here’s a quick-reference table to guide your first moves.
Immediate Actions for an Internal Fridge Leak
| Priority Action | Why It's Critical | Tools Needed |
|---|---|---|
| Relocate Food | Prevents contamination and spoilage from standing water. Protects your inventory investment. | Clean food-safe containers, an alternate cooler or fridge. |
| Soak Up Water | Minimizes slip hazards for staff and prevents water from seeping into door seals or damaging components. | Absorbent towels or a wet-dry vacuum. |
| Power Down (Optional) | If the leak is severe or near electrical components, unplugging the unit is a critical safety measure. | None. |
| Inspect the Drain Pan | Check if the drain pan underneath the unit is overflowing. This can help you quickly identify a simple drainage issue. | Flashlight. |
Taking these steps buys you time and keeps your kitchen safe, allowing you to move on to diagnosing the root cause without panicking.
The Most Common Causes of an Internal Fridge Leak
Several issues can lead to a fridge dripping inside, but a few culprits are far more common than others. In my experience, it's almost always one of the following. Understanding these will help you diagnose the problem fast. Drain blockages, for instance, are the most frequent cause. Industry diagnostics show this single issue affects up to 80% of commercial refrigeration failures. If you want to dive deeper, All Southern has some great insights on common refrigeration system issues.
Here’s what you should investigate first:
- Clogged Defrost Drain: This is culprit number one, hands down. Tiny food particles, ice, or just general grime can create a blockage in the drain line. When that happens, defrost water has nowhere to go but back up and spill into the main compartment.
- Damaged Door Gaskets: A worn, cracked, or even just dirty door seal is like leaving the door open. It allows warm, humid air to constantly sneak into the unit. This creates way more condensation than the defrost system can handle, leading to drips and puddles.
- Blocked Air Vents: This is an easy one to overlook. If boxes or containers are pushed up against the interior air vents, cold air can't circulate properly. That disruption causes ice to build up on the evaporator coils, which then melts unevenly and drips everywhere.
- Defrost System Malfunction: If the simple fixes don't work, you might be looking at a failed component. The defrost system relies on a timer, heater, and terminator thermostat to work correctly. If any one of these parts fails, the unit can't melt frost as it should, leading to a massive ice buildup that eventually melts and leaks.
Before you dive into complex repairs, always start with the simplest explanations. A thorough inspection of the drain, seals, and vents will solve the problem in most situations, saving you from an unnecessary service call. This guide will walk you through each step.
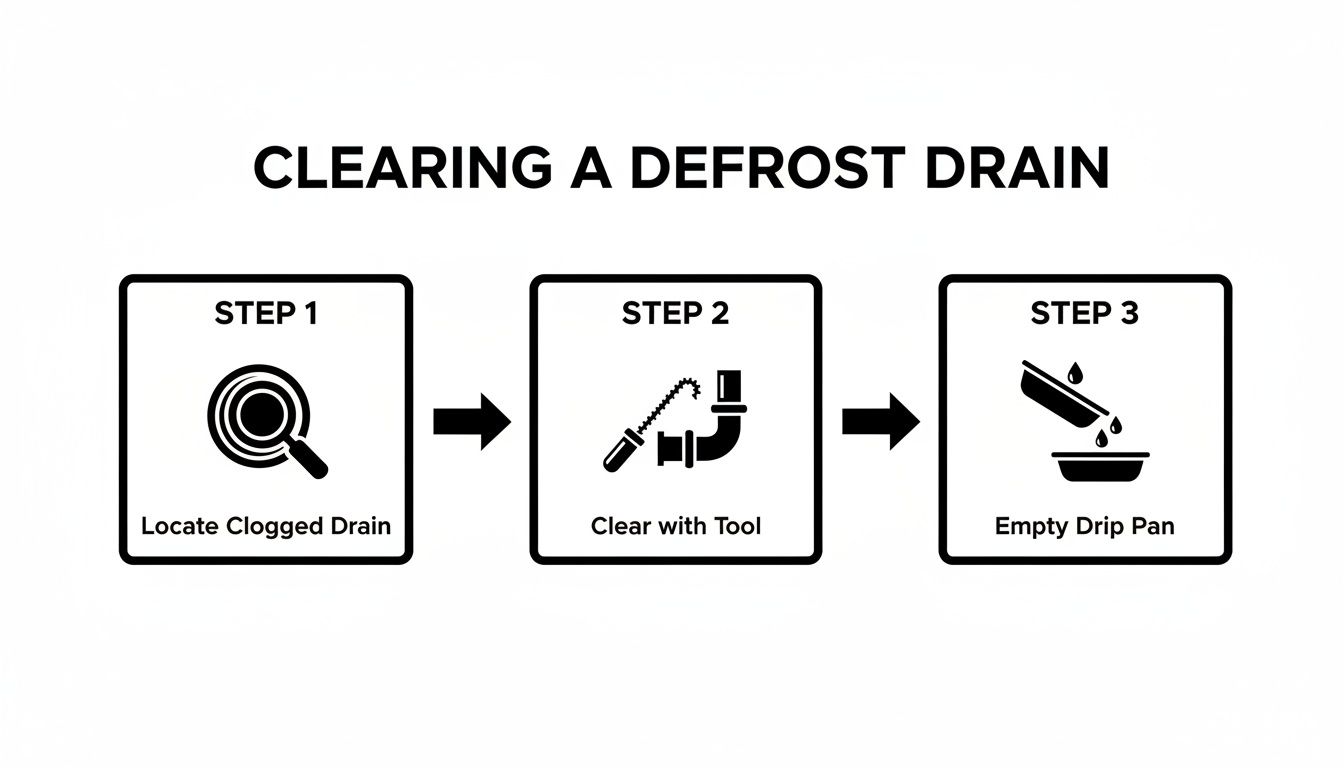
How to Find and Unclog a Defrost Drain
When you find puddles inside your fridge, a clogged defrost drain is the prime suspect. It’s almost always the culprit. Over time, little bits of food, ice shards, and other gunk build up inside this small drain tube, creating a nasty blockage.
This forces all the water from the unit's automatic defrost cycle to back up with nowhere to go. The result? It spills out into the main compartment, leaving you with the mess you're seeing now. The good news is, you can usually tackle this one yourself with just a few basic tools and a bit of patience.
Locating the Drain Hole and Pan
First things first, you need to find the drain hole. On most commercial refrigerators, it’s a small opening on the back interior wall. You'll typically find it just above the floor of the unit, tucked underneath the evaporator coil cover. You might have to pop off a small plastic or metal panel to get a good look at it.
Once you’ve spotted the drain hole, you need to find its exit point: the drain pan.
- Carefully slide the refrigerator away from the wall so you can get behind it.
- Look for a shallow plastic or metal tray near the bottom of the unit, usually right by the compressor.
- If that pan is full of water, you’ve just confirmed the drain is clogged and overflowing.
Gently remove the pan, dump the old water in a sink, and give it a good scrub with soap and water before putting it back. This little step keeps nasty odors and bacteria from taking hold.
A full drain pan is the smoking gun for a blockage upstream. But even if the pan isn't overflowing, a clog can still cause water to back up directly into the fridge before it even gets a chance to reach the pan.
Clearing the Clog Safely and Effectively
Alright, time to clear out that clog. The key here is to avoid harsh chemicals—they can easily damage the plastic drain line. Instead, try one of these simple and effective methods.
The Warm Water Flush
Always start with the gentlest approach. Grab a turkey baster or a small funnel, fill it with warm (not boiling!) water, and slowly squirt it down the drain hole inside the fridge. A lot of the time, the warm water is all it takes to melt a small ice dam or loosen up minor gunk. If it's working, you should hear the water trickling down into the clean drain pan you just put back.
The Flexible Cleaner Method
If the warm water didn't do the trick, you'll need to get in there and manually break up the blockage. A long, flexible pipe cleaner or even a thin piece of plastic tubing is perfect for this.
Gently push it down the drain hole and work it back and forth. You're not trying to ram it through; you just want to wiggle it around to loosen the debris. Once you feel like you've broken it up, follow it with another warm water flush to rinse everything out. This one-two punch works for most stubborn clogs.
The basic idea here is a lot like clearing out other condensation lines. For a great breakdown of the mechanics, which are very similar to what's happening in your fridge, check out this practical guide to clogged AC condensation drains. It offers some extra context on how these simple but critical systems work.
Time to Check the Door Gaskets and Air Vents
If you’ve cleared the defrost drain and you're still finding puddles inside your unit, the next culprit is almost always the door gasket. Think of a worn-out, dirty, or loose door seal as an open invitation for all that warm, humid Southern California air to sneak into your refrigerator.
This constant stream of warm air creates way too much condensation, overwhelming the defrost system and leading to those frustrating drips.
While the defrost drain is the most common cause, a bad seal is a very close second. The process below is a great starting point for any internal leak.
When locating, clearing, and emptying the drain pan doesn't solve the problem, it's time to move on to the seals.
Is the Door Seal Doing Its Job?
You don’t need any fancy equipment for this one. The classic “dollar bill test” is a trick we’ve used in restaurant kitchens for years, and it works perfectly. It’s a super simple diagnostic that will tell you in seconds if your gasket is failing.
Here’s how to do it:
- Open the refrigerator door and slide a dollar bill about halfway over the gasket.
- Close the door on the bill so it’s pinched in place.
- Now, gently try to pull the bill out.
If you feel a solid amount of resistance, the seal in that spot is good to go. But if the bill slides out easily with almost no effort, you’ve found a leak. Make sure to test this in several places all the way around the door—the corners and the hinge side are often the first to fail.
A faulty door gasket doesn't just cause leaks. It forces your compressor to work overtime trying to keep things cool, which means higher energy bills and a shorter lifespan for your equipment. It’s a small part that can have a huge impact on your bottom line.
Gasket Maintenance and Keeping Vents Clear
Let's say your gasket failed the dollar bill test. The fix is often pretty simple. First, give that gasket a good, thorough cleaning with warm, soapy water. Get rid of any grease, grime, or food debris that might be getting in the way of a tight seal. If you notice it’s cracked, torn, or has become brittle, it’s time to order a replacement.
Another huge—and often overlooked—problem is blocked interior air vents. I've seen it a hundred times in busy kitchens: someone shoves a box of produce or a stack of prep containers right up against the vents. This chokes off the flow of cold air and messes up the unit's ability to cool evenly.
When that happens, ice starts forming where it shouldn’t, especially on the evaporator coils. Then, when the defrost cycle kicks in, that misplaced ice melts and drips all over the place. Take a quick look inside your undercounter unit or prep table and make sure there are at least a few inches of clearance around every vent. You’d be surprised how often this simple adjustment fixes the dripping immediately.
Troubleshooting the Defrost System
If you've already cleared the drain and checked the gaskets but the fridge is still dripping, it's time to look a little deeper. That persistent leak might be a cry for help from the unit's defrost system—the internal mechanism that melts frost off the evaporator coils before it has a chance to build up.
A properly working defrost system is completely hands-off. But when it fails, those coils get buried under a thick, snowy blanket of ice. This chokes off airflow, forces the compressor to work overtime, and eventually, that ice melts uncontrollably. The result is a stubborn internal drip that simple fixes just can't touch.
Key Defrost System Components
You don't need to be a technician to understand the basics, but knowing the lingo helps. If you can accurately describe the problem to a pro, you'll save yourself time and money.
- Defrost Timer: Think of this as a simple clock that tells the fridge when it's time to switch from cooling to defrosting. A bad timer can get stuck in the cooling cycle, meaning the frost never gets a chance to melt.
- Defrost Heater: This is the heating element that actually does the melting. When it gets the signal, it warms up and clears the ice off the evaporator coils. If the heater burns out, the defrost cycle will run, but nothing will happen.
- Terminator Thermostat: This part is a sensor. It monitors the temperature of the coils and, once the ice is gone, tells the timer to get back to cooling. A broken terminator can prevent the heater from ever switching on in the first place.
A tell-tale sign of a defrost system failure is a thick, solid layer of frost on the evaporator coils that just won't go away. A little bit of frost is normal, but a solid block of ice is a dead giveaway that one of these parts has probably failed.
Diagnosing a Deeper Mechanical Failure
While swapping out these components is usually a job for a qualified tech, recognizing the signs will help you make the right call. A failing defrost system often brings other symptoms along for the ride. You might notice the compressor is running non-stop as it struggles to keep things cold, which can also lead to some pretty strange noises.
If you’re hearing odd sounds on top of the leak, our guide on what to do when your fridge is making a loud noise can help you connect the dots. These problems often go hand-in-hand, pointing directly to a mechanical failure that needs professional attention. It’s better to fix the root cause than to keep mopping up puddles.
Smart Maintenance to Prevent Future Drips
The best way to deal with a fridge dripping on the inside? Stop it from ever happening in the first place.
Shifting from a reactive "fix-it-when-it-breaks" mindset to a proactive one is a game-changer for any Los Angeles kitchen, whether you're running a bustling Mexican food spot, a popular food truck, or a top-tier Los Angeles pizza joint. A simple, consistent maintenance schedule for your restaurant equipment is your best defense against emergency service calls, spoiled inventory, and frustrating kitchen downtime.
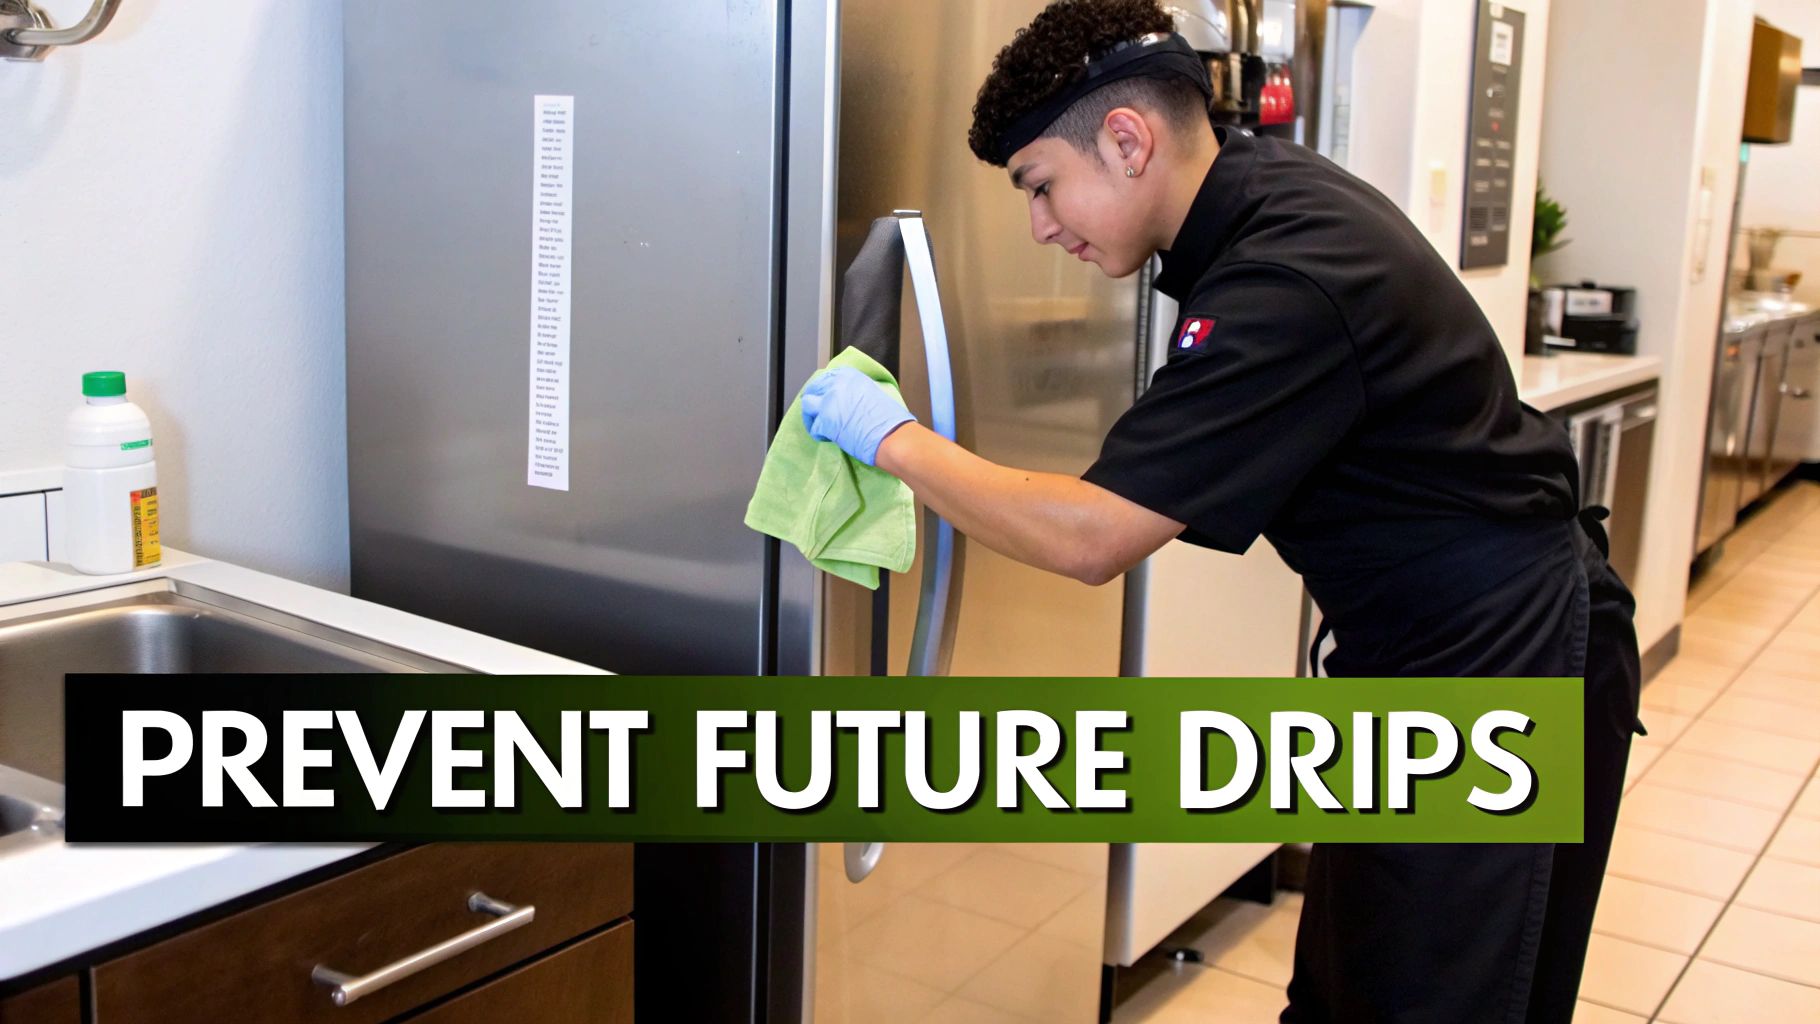
Getting into these habits does more than just stop puddles from forming. A well-maintained unit is an energy-efficient unit, and that shows up on your utility bills. It also adds years to the life of your equipment, protecting one of your biggest investments.
Creating Your Maintenance Schedule
Consistency is everything. You don't need a bunch of fancy tools or special training to get started—just a routine. By assigning these small tasks to your kitchen crew, you ensure they get done without overwhelming any one person.
Here's a straightforward checklist you can put into action today.
Commercial Fridge Maintenance Checklist
| Frequency | Task | Benefit |
|---|---|---|
| Daily | Wipe down door gaskets with a damp cloth. | Prevents grime buildup that can compromise the seal, keeping warm air out and reducing condensation. |
| Weekly | Check interior air vents for obstructions. | Ensures proper airflow, preventing ice buildup on evaporator coils and promoting even cooling. |
| Weekly | Inspect and empty the drain pan. | Catches early signs of a slow drain before it becomes a major clog and eliminates standing water that can harbor bacteria. |
| Monthly | Deep clean the interior, including shelves and walls. | Removes food particles and spills that could eventually find their way into the defrost drain and cause a blockage. |
This simple schedule is designed to tackle the most common causes of internal dripping before they have a chance to become serious problems.
Think of this routine like basic prep work in the kitchen—it's not glamorous, but it’s essential for a smooth service. A few minutes each day is far better than a few hours of mopping up a leak and dealing with a technician.
The Value of Professional Servicing
While your team's daily and weekly checks are vital, they can't replace the expert eye of a trained technician. Bringing in a pro every quarter, or at least twice a year, is a smart investment. They can handle the jobs that are outside the scope of daily kitchen duties, making sure your restaurant equipment is running at peak performance.
A professional will:
- Clean Condenser Coils: Dirty coils make the compressor work overtime, which burns more energy and leads to premature failure.
- Check Refrigerant Levels: If the refrigerant is low, it’s a sure sign of a leak that will cripple your unit’s cooling power.
- Calibrate Thermostats: This ensures your fridge holds a precise, food-safe temperature without wasting electricity.
- Inspect Electrical Components: A technician can spot frayed wiring or failing parts long before they cause a complete system breakdown.
This one-two punch of your team's daily diligence and expert technical care is the key. For a more detailed breakdown, check out our full guide to commercial kitchen equipment maintenance. This strategy keeps your equipment humming and lets you focus on what really matters: serving amazing food.
When to Call a Technician or Upgrade Your Equipment
Look, a lot of the fixes for a leaky commercial fridge are things you can handle yourself with a bit of elbow grease. But a smart operator knows when it's time to put the tools down and pick up the phone. If you've gone through the checklist—cleared the drain, checked the gaskets, made sure the vents are breathing—and you’re still finding puddles, it’s time to call in a professional.
There are some warning signs that scream "this is bigger than a simple clog." Ignoring them is a recipe for disaster. You could be looking at catastrophic food spoilage, an emergency repair bill that’ll make your eyes water, or a total unit failure right in the middle of a dinner rush.
Red Flags That Demand a Professional
If you see any of these issues along with the internal dripping, don't wait. Get a qualified refrigeration tech on the line.
- Strange Noises: Is your unit making weird buzzing, clicking, or grinding sounds it never used to? That's often the sound of a compressor giving up the ghost or a key part of the defrost system failing.
- It Never Shuts Off: If you notice the compressor is running constantly, it’s working way too hard just to keep things cool. This could signal anything from a serious refrigerant leak to a major mechanical failure.
- The Leak Keeps Coming Back: You clean out the drain line and everything seems fine, but a week later, the puddle is back. This is a classic sign of a deeper, more stubborn problem that a quick fix won't solve.
If that dripping has caused a lot of water to pool up, creating soggy floors or walls, you might even need to look into professional water damage restoration to prevent mold and rot.
Think of it this way: if the simple solutions don't work, you're no longer just mopping up a puddle. You're treating a symptom of a much larger mechanical illness that needs a specialist.
The Financial Tipping Point for Upgrades
Sooner or later, you hit a point where throwing money at repairs just doesn't add up anymore. Bleeding cash on service calls for an old, tired piece of equipment is a drain on your business.
Here's a good rule of thumb: if a single repair is going to cost you more than 50% of what a brand-new unit would, it's almost always smarter to replace it.
For restaurant owners in Los Angeles, upgrading to modern restaurant equipment with a solid warranty is about more than just stopping a leak. New models from trusted brands like Atosa are built with far superior drain systems and are way more energy-efficient. Not only does this prevent the very issues that cause a fridge to drip in the first place, but it also shaves money off your utility bills every single month. You can check out some of these workhorses in our guide to energy-efficient commercial refrigerators.
Ultimately, investing in new equipment is about peace of mind. It’s knowing your inventory is safe and your kitchen can operate without another unexpected, frustrating interruption.
Ready to stop worrying about unreliable equipment? LA Restaurant Equipment offers a wide range of new, warranty-backed commercial refrigerators with modern features to keep your kitchen running smoothly. Explore our collection and get fast, free shipping at https://larestaurantequipment.com.