

At its core, a chafing dish is really just a simple steam bath. You fill the bottom pan with hot water, place it on a stand over a heat source, and then nestle your food pan right on top. It’s a beautifully simple setup that keeps everything from your carnitas to your creamed spinach at a perfectly safe—and delicious—temperature for hours.
Getting to Know Your Chafing Dish
Before you can master the art of the buffet line, you've got to know your equipment inside and out. A chafing dish might look straightforward, but every single piece has a job to do. When they all work together, your service is flawless. I can't tell you how many times I've seen common catering mishaps, like scorched sauces or lukewarm entrees, happen simply because someone didn't understand how the components work together.
Getting familiar with your chafing dish is your first line of defense against those problems. Think of it less as just another piece of restaurant equipment and more as your key to a successful event. With buffet-style dining more popular than ever, these units are essential. In fact, industry experts project that chafing dishes will see the fastest growth in the serveware market, with an expected CAGR of 4.3%, all thanks to their critical role in catering and restaurants.
The Core Components and Their Roles
Every part of a standard chafing dish is designed for a specific task. Let's break down the lineup.
- The Frame or Stand: This is the backbone holding everything up. A wobbly frame in a busy buffet line is a disaster waiting to happen, so make sure yours is sturdy and stable.
- The Water Pan: You could argue this is the most important piece of the puzzle. This deep pan holds the hot water that creates the gentle steam, acting as a crucial buffer between the direct flame and your food.
- The Food Pan: This is where the magic happens—it holds your culinary creations. It sits right inside the water pan, getting that gentle, even heat from the steam below. And remember, the size of this pan really matters. Check out our guide on how to choose the right chafing dish size to make sure you're covered.
- Fuel Holders & Fuel: These little canisters are the engine of the whole operation. They sit securely under the water pan and hold your gel or wick chafing fuel, providing the consistent heat you need.
- The Lid: It’s more than just a cover. A good lid traps steam and heat, keeping the temperature steady and making sure your food doesn't dry out.
To make it even easier, here's a quick reference table to keep the parts straight.
Chafing Dish Component Quick Reference
| Component | Primary Function | Pro Tip |
|---|---|---|
| Frame/Stand | Provides a stable base for the entire setup. | Check for stability on a flat surface before adding hot water or food. |
| Water Pan | Holds hot water to create a gentle steam bath. | Always start with pre-heated water to speed up the process significantly. |
| Food Pan | Holds the prepared food, sits inside the water pan. | Use the correct size pan for your dish to ensure even heating. |
| Fuel Holders & Fuel | Contain the heat source (gel or wick fuel). | Ensure holders are securely placed in the frame to prevent tipping. |
| Lid/Cover | Traps heat and moisture to maintain food quality. | Keep it on as much as possible to hold temperature and prevent drying. |
Knowing these parts and their jobs is the first step toward a smooth, professional-looking buffet service.
If you take away one thing, let it be this: the system only works because of the water. Starting with hot water in the water pan isn't just a suggestion—it's a non-negotiable step for any pro. It dramatically cuts down the time it takes to get your setup to a safe holding temperature.
Fuel and Electric Chafer Setup Guide
A flawless setup is the bedrock of both food safety and great presentation. Whether you're running one of the many popular Los Angeles food trucks at a packed festival or catering a quiet corporate luncheon, knowing your way around a chafing dish starts with a solid foundation. Both the classic fuel chafers and their modern electric cousins have their place, but each demands its own approach.
At its core, any chafing dish is just a few key components working together. Think of it as a simple stacked system.
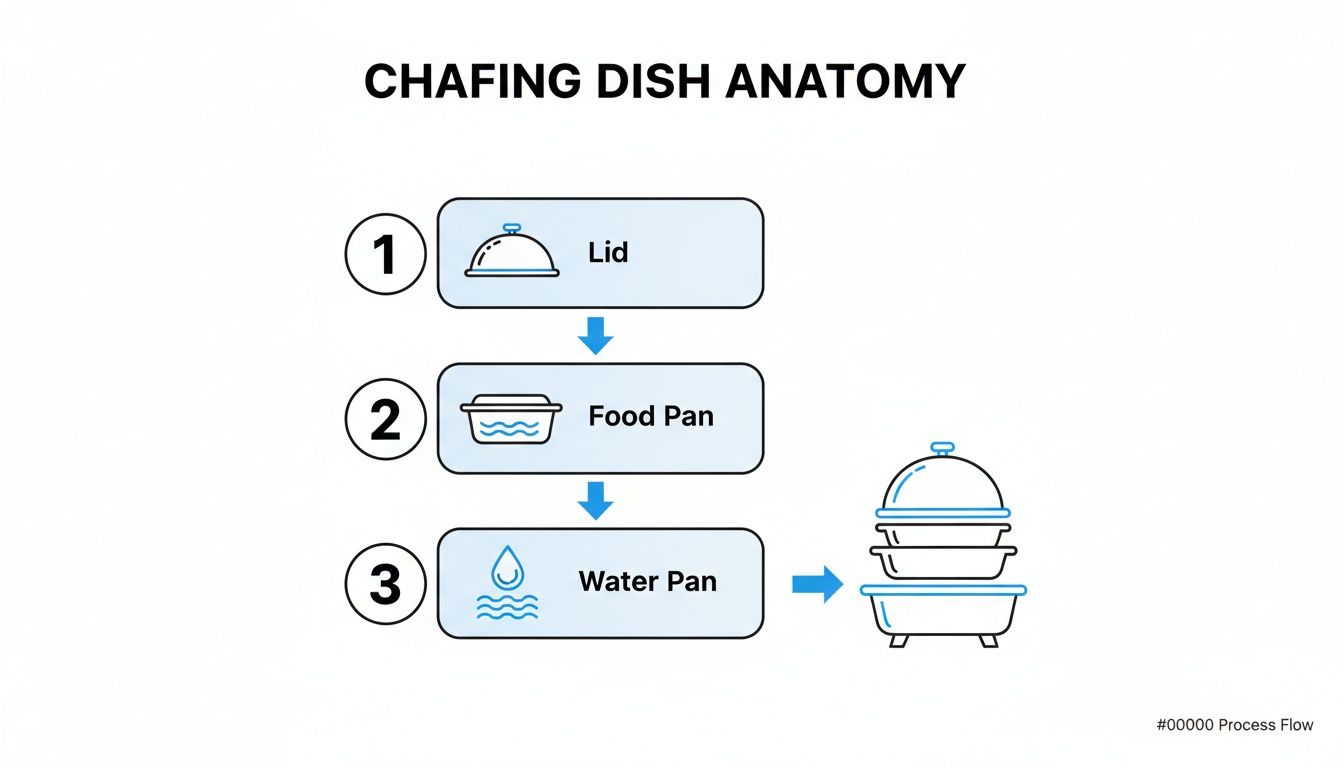
Getting this system—lid, food pan, and water pan—right is the first step. Nail this, and you've pretty much mastered temperature control.
Setting Up Fuel-Powered Chafers
For a lot of caterers, especially when you're working an event without easy power access, fuel canisters are the only way to go. The setup is simple, but you've got to pay attention to the details to keep things safe and effective.
First things first: get your chafer frame on a completely level and sturdy surface. A wobbly setup is a disaster waiting to happen. Next, pour about one inch of hot water into the water pan. Starting with hot water isn't just a suggestion; it’s a non-negotiable pro tip. It dramatically cuts down the time it takes to get up to a safe holding temperature.
Now, let's talk about the heat source. You’ve got a couple of options:
- Wick Fuel: This is your long-haul solution. It's known for a consistent burn that can last 4-6 hours, making it perfect for longer events. Just unscrew the cap and pop the canister into its holder.
- Gel Fuel: This stuff typically burns hotter but for a shorter time, usually around 2-3 hours. You'll need to pop the lid off with a blunt tool before placing it in the fuel holder.
With the fuel in place, carefully light it using a long-stemmed lighter. Then, slide the water pan into the frame over the flames and give the water a few minutes to come to a gentle simmer before you even think about adding your food pan.
A rookie mistake is lighting the fuel after the water and food are in place. Light the fuel first. This lets you work safely without reaching under pans of hot water and food, which goes a long way in preventing burns.
Mastering Electric Chafer Setup
Electric chafing dishes bring incredible precision to the table. They’re a favorite for indoor venues, hotel buffets, and anywhere else with reliable power. The biggest win here is the built-in thermostat—it takes all the guesswork out of the equation.
Start by placing the unit near a good power outlet. Make sure the cord isn't stretched across a walkway where guests or your staff could trip over it. Just like with the fuel-powered version, you'll want to add about an inch of hot water to the water pan.
Plug it in and set the thermostat where you need it, which is usually somewhere between 140°F and 160°F (60°C to 71°C). Most electric models have a little indicator light that tells you when it’s heating up and when it’s hit the target temperature.
Let the unit preheat completely before adding the food pan. This ensures that gentle steam bath is ready to go from the second the food goes in, which stops it from dipping into the temperature "danger zone." And always, always double-check that your power source is stable. A blown circuit in the middle of service can bring your entire buffet line to a screeching halt.
Maintaining Safe Food Temperatures
A chafing dish has one job, and it's a big one: keeping hot food safely hot. This isn't just about making sure your guests enjoy their meal; it’s a critical food safety standard. Your target is to keep every dish above the crucial 140°F (60°C) mark, steering clear of that temperature "danger zone" where bacteria love to multiply.
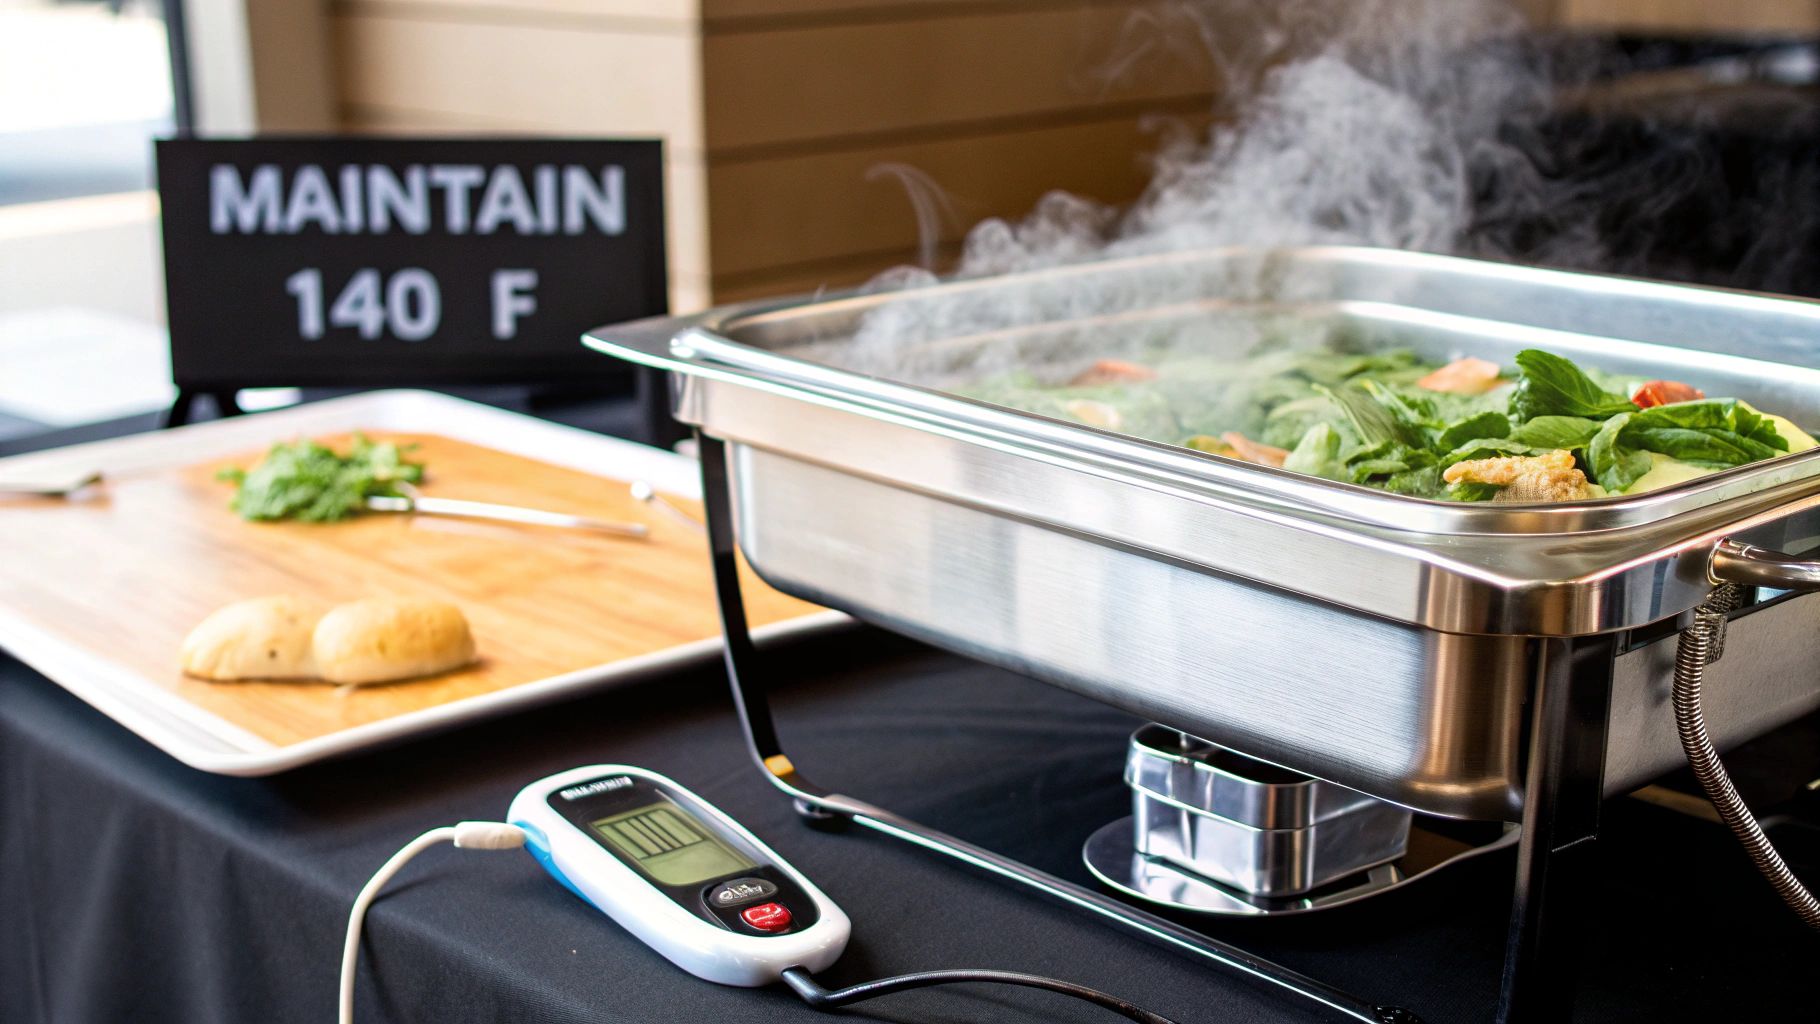
The water pan is your most important ally in this fight. That gentle steam is what delivers that consistent, even heat you need. Here's a pro tip that makes a huge difference: always preheat the water before pouring it into the pan. It’s a game-changer that dramatically cuts down the time it takes to get everything up to a safe holding temperature.
The Role of Water and Heat Management
Think of that water pan as a buffer. It’s the only thing standing between the direct, often harsh heat of the fuel can and the bottom of your food pan. This simple setup is what prevents scorching, which is especially critical for anything delicate like a cream sauce, scrambled eggs, or cheesy pasta.
To really nail the technique, here’s how we do it in the field:
- Fill It Just Right: Aim for about one inch of hot, simmering water in the water pan. If you use too little, it'll evaporate before you know it, and you risk burning your food. Put in too much, and the food pan can actually start to float, which makes for unstable and very inefficient heating.
- Keep a Lid On It: That lid is your best friend for trapping heat and moisture. You want to keep it on as much as you can to hold that temperature steady and stop your dishes from drying out. When someone's ready to serve, lift the lid away from them and tilt it so any condensation drips right back into the pan, not onto the tablecloth.
- Watch Your Water Levels: For longer events, you’ve got to keep an eye on the water level. I make it a habit to check every hour or so. If it’s getting low, just top it off with more hot water to keep that steam bath going strong.
Mastering temperature is what separates the amateurs from the pros. A well-managed chafer ensures the last guest in line gets a plate that's just as hot, delicious, and safe as the first. In this business, that commitment to quality is non-negotiable.
Thermometers and Pan Rotation Strategies
Guesswork is a recipe for disaster in food service. The only way to be absolutely sure your food is safe is to check its internal temperature regularly. Get a good, calibrated food thermometer and stick it right into the thickest part of the dish, making sure to stay away from the pan's edges for a true reading.
When you're running a bigger event with a whole line of chafers, a smart move is to rotate your full-size steam table pans every so often. You might notice one end of the buffet line runs a bit hotter than the other. A simple swap now and then prevents any cold spots from developing and keeps the quality consistent down the entire line. You can learn more about optimizing your steam table pan usage in our detailed guide.
Of course, temperature is just one piece of the puzzle. Safe buffet service also means having rock-solid hygiene practices and a deep understanding of preventing cross-contamination in your kitchen.
Serving and Refilling Without Missing a Beat
Great buffet service is more than just keeping food hot. It's an art form. The real goal is to create a seamless, inviting experience for every single guest. How you arrange and manage your chafing dishes can be the difference between a chaotic scramble and an elegant, easy-to-navigate flow. This is especially true when you've got a diverse menu, whether it's a sprawling Los Angeles pizza party or a complex Mexican food buffet where guests need to access multiple components.

The first step is a strategic layout. Think about how guests actually move through a line. Placing salads and cold items first, followed by main courses and sides, is a classic for a reason—it prevents traffic jams. If you're running a taco bar, for instance, you'd arrange the chafing dishes in a logical order: warm tortillas, then proteins like carnitas or barbacoa, followed by warm toppings like grilled peppers and onions.
Equipping Your Buffet for Success
The right serving utensils are completely non-negotiable. You can't just throw any old spoon in there. Using the correct tool for each dish helps with portion control, keeps the serving area tidy, and—most importantly—prevents cross-contamination. Imagine a guest trying to scoop refried beans with a fork. It’s a recipe for a mess.
- Spoons with Deep Bowls: These are your best friend for saucy dishes like chicken tinga or mole. They ensure guests get plenty of that delicious sauce without dripping it all over the table.
- Slotted Spoons: Perfect for items where you want to leave the liquid behind, like pico de gallo or fajita vegetables.
- Tongs: An absolute must-have. Tongs are essential for items like grilled chicken, pasta, or even grabbing warm tortillas. They offer a secure grip and precise control that a spoon just can't match.
The cardinal rule of buffet service? Never let a dish look empty. A half-empty pan screams scarcity and can make perfectly good food look unappealing. The secret is proactive refilling, which all starts with good preparation behind the scenes.
Mastering the Art of the Swap
The most critical skill in managing a buffet line is refilling your chafing dishes without interrupting the guest experience or, heaven forbid, compromising food safety. It's not about raw speed; it's about having a system. The goal is to make the swap so smooth that most guests won't even notice it happened.
This is where having backup pans ready to go is a complete game-changer. For any busy food truck or catering event, we always have a second set of food pans heated and waiting in a holding cabinet or a low oven. When a pan on the line gets down to about one-third full, it's time to make the switch.
And please, don't just top off the existing pan. This practice, often called "commingling," is a major food safety risk and leads to uneven temperatures. Instead, pull the entire old pan and replace it with the fresh, hot one. This guarantees every serving is held at a safe temperature and the buffet always looks abundant and fresh. It’s a quick, decisive action that keeps the line moving and maintains the high quality your guests expect.
Proper Cleaning, Transport, and Storage
Once the last guest has been served and the event is winding down, it’s time for the breakdown. Your chafing dishes are a serious investment, and how you handle them after the gig is just as important as how you set them up. Proper care directly impacts their lifespan and performance, ensuring they look pristine for your next Los Angeles catering job.
First things first, let the chafing dishes cool down completely on their own. Never pour cold water into a hot water pan. This can cause the metal to warp—a nasty phenomenon called thermal shock—and you'll be left with a pan that doesn't sit flat. Once everything is cool to the touch, break it all down: lid, food pan, water pan, and the frame.
Best Practices for Cleaning Stainless Steel
Stainless steel is tough, but it’s not invincible. To keep that mirror finish and avoid scratches that can trap bacteria, always reach for non-abrasive tools. A soft cloth or sponge with some warm, soapy water is your best friend for everyday cleaning.
What about that stubborn, baked-on food?
- Soak it first. Fill the food pan with hot water and a bit of dish soap and just let it sit. Time is your best tool here; it'll loosen most of the gunk without you having to break a sweat.
- Use a gentle touch. For anything that hangs on, a plastic scraper or a nylon scrubbing pad will do the trick. Stay away from steel wool or harsh scouring powders—they'll leave permanent scratches.
- Try a baking soda paste. A simple paste made from baking soda and water works wonders on tough spots without damaging the finish.
A solid cleaning routine is the backbone of any professional kitchen. For more great insights on keeping your entire operation sparkling and compliant, check out these top tips for commercial kitchen cleaning, which cover everything from daily wipe-downs to HACCP standards.
Smart Transport and Storage Solutions
Scratches, dents, and misplaced lids—we've all been there. Proper storage is your defense against the daily wear and tear of a busy catering operation. This is especially true if you’re running a food truck, where every inch of space counts and equipment is constantly on the move. If your chafers didn't come with their own boxes, think about grabbing some padded carrying cases.
Investing in stackable chafing dish models or dedicated storage racks can be a game-changer for organization and efficiency. It saves valuable space and minimizes damage during transit, ensuring your equipment stays in top condition.
Keeping your gear in prime condition is about more than just chafers, of course. For a deeper dive into extending the life of all your equipment, from ranges to refrigerators, our complete guide to commercial kitchen equipment maintenance is a must-read.
Troubleshooting Common Chafing Dish Problems
Even the most buttoned-up catering service hits a snag during a busy event. When you're in the weeds managing a buffet, whether for a sprawling Los Angeles pizza party or an intimate corporate lunch, you don’t have time for guesswork. Knowing how to use your chafing dishes is one thing; knowing what to do when they misbehave is another.
When the Flame Won't Stay Lit
It's a classic outdoor event problem: the wind decides to pick up, and your fuel canisters just won't stay lit. A sudden breeze can extinguish a flame in seconds, putting your carefully managed food temperatures right in the danger zone.
The fastest fix is to create a makeshift wind guard. Don't be afraid to get creative. We’ve all used spare restaurant equipment—like an inverted sheet pan propped up just right—or even decorative elements from the venue to shield the fuel holders. Whatever blocks the wind and keeps that flame steady is your best friend in that moment.
Fine-Tuning Heat and Managing Moisture
Another all-too-common headache is food getting too hot and starting to scorch at the bottom of the pan. This is a killer for delicate sauces or those cheesy Mexican food dishes. This almost always means there’s too much direct heat hitting the pan.
Your first move? Slightly close the damper on the fuel canister lid to shrink the flame. If that’s still not cutting it, adding a bit more hot water to the main water pan can help diffuse the heat and spread it out more evenly.
On the flip side, you've got condensation. Nothing looks less professional than a staff member lifting a chafer lid and sending a pool of water dripping onto a crisp, white tablecloth.
The secret is all in the training. Teach your team to tilt the lid away from the table as they lift it. This channels all that condensation right back into the water pan where it belongs. It’s a tiny detail that makes a huge difference.
And sometimes, the problem is as simple as running out of juice. Fuel canisters can burn out faster than you expect, especially on a cold or windy day. The only solution is preparation: always have backup canisters on hand, ready for a quick, safe swap. A well-prepared team can handle these little hiccups without breaking a sweat, ensuring the guest experience never falters.
When things go sideways during service, you need answers fast. Here’s a quick-reference table to help you diagnose and solve the most frequent chafer issues on the fly.
Quick Fixes for Common Chafer Problems
| Common Problem | Likely Cause | Immediate Solution |
|---|---|---|
| Flame keeps going out | Wind or drafts are extinguishing the fuel. | Create a temporary windbreak using sheet pans, foil, or other equipment. Reposition the chafing dish if possible. |
| Food is scorching or burning | Too much direct heat from the fuel canister. | Partially close the damper on the fuel holder to reduce the flame. Add more hot water to the water pan to better distribute heat. |
| Food isn't staying hot enough | Insufficient heat, not enough water, or lid is frequently left open. | Open the fuel damper fully. Ensure the water pan has at least 1 inch of hot water. Gently remind guests or staff to replace the lid after serving. |
| Water drips on the table | Condensation is collecting inside the lid. | Train staff to lift the lid and tilt it back over the water pan, allowing condensation to drip back into the chafer, not onto the table. |
| Fuel canister runs out mid-service | The canister has reached the end of its burn time. | Safely remove the old canister with tongs and immediately replace it with a pre-lit backup canister. Never leave a station unattended. |
With these quick fixes in your back pocket, you can tackle most common chafer issues with confidence, keeping your buffet line moving and your food perfectly served.
Your Top Chafing Dish Questions Answered
Even the most seasoned pros run into questions in the heat of service. When you’re juggling a dozen things at once, you need quick, reliable answers. From LA caterers hustling at a film set to Los Angeles food truck owners setting up for a weekend festival, these are the questions we hear most often.
How Long Does Chafing Fuel Last?
This is a big one, and the answer completely depends on the type of fuel you’re using. Getting this right is crucial for a smooth event.
- Wick fuel is your go-to for long-haul events. Think of it as the marathon runner of the fuel world. These canisters typically burn with a steady, consistent flame for a solid 4 to 6 hours. Perfect for weddings or all-day conferences.
- Gel fuels are more like sprinters. They often burn hotter, which is great, but they burn out faster, usually lasting around 2 to 3 hours.
My advice? Always check the manufacturer's label, but more importantly, live by the rule of "always have backups." Having a fresh can ready to swap out is the only way to guarantee you’re holding food at a safe, consistent temperature all service long.
Can I Use a Chafing Dish to Heat Cold Food?
This is a hard no. A chafing dish is a holding unit, not a cooking appliance. Its job is to keep already hot food hot.
You absolutely must heat your food to a safe internal temperature (that’s typically 165°F) on a proper stove or in an oven first. Only then should you transfer it to your preheated chafer.
Trying to heat cold food directly in a chafer is a recipe for disaster. It will spend way too much time in the temperature "danger zone" (40°F - 140°F), creating a serious food safety risk you can’t afford to take.
Do I Really Need to Put Water in the Water Pan?
Absolutely. The hot water is the most critical part of the system. It creates a gentle steam bath that heats the food pan evenly and prevents scorching. Without water, the direct heat from the fuel would burn the food.
It’s that simple. Skipping the water means you'll scorch the bottom of your pan and ruin your product.
How Do I Keep Condensation From Dripping Everywhere?
When you lift the lid, condensation is just a fact of life. The trick is to manage it like a pro.
As you lift the lid, just tilt it slightly. This allows all that built-up water to drip right back into the food pan instead of all over your tablecloth or, even worse, a guest. Keep a clean, dry cloth tucked in your apron to give the edge of the lid a quick wipe—it’s a small touch that keeps your station looking sharp and professional.
For all your restaurant equipment needs, from chafing dishes to commercial refrigeration, trust the experts at LA Restaurant Equipment. We offer warranty-backed, warehouse-direct pricing to help your business thrive. Explore our full catalog and get fast, free shipping at https://larestaurantequipment.com.